Monthly Archives: November 2010

Hazelnut Espresso Scones


Weekend mornings are not complete without a morning cappuccino. Over the years, I’ve thought about getting a professional espresso machine that will do all the brewing and frothing for me, but so far, my stovetop espresso maker and a handheld frother has been doing a fabulous job. A few years ago I bought a book about espresso that had many different recipes in it, and always wanted to try a few of them, but never got around to it. Finally last weekend, I decided to finally make one of the recipes in the book that I thought would go perfectly with my morning cappuccino – Hazelnut Espresso Scones.

The smell of the roasted hazelnuts filled the house for the rest of the day – it smelled so delicious. The hazelnuts were so easy to chop after being roasted and the made a nice crunching sound 🙂

The recipe didn’t call for an egg wash, but seeing as the scones looked a bit dry before they were baked, I thought an egg wash may give them a nice brown surface.
………………………

The recipe calls for almost as much crushed hazelnuts in the dough as it does of flour, so the finished product is VERY hazelnutty, which for me, was great because I love hazelnuts. It was definitely made for having with a warm drink – a coffee or tea, as it was on the dry side. I also substituted honey for sugar to cut down on the processed sugar. Overall, I think these scones make a great breakfast with the morning coffee or a snack with tea.

…………………………………………………………………………………………………………….
For high resolution images, please click on each photo
……………………………………………………………………………………………………………..

RECIPE

………………………………………………………………………………………………………………

Hazelnut Espresso Scones

Ingredients
  • 1 1/4 cups ( ounces) hazelnuts
  • 1 1/2 tbls espresso beans
  • 1/3 cup milk
  • 2 1/2 cups unbleached all-purpose flour
  • 1 tbls baking powder
  • 1/2 tsp salt
  • 8 tbls cold unsalted butter
  • 1/3 cup packed brown sugar
Preheat oven to 350 F. Place the hazelnuts and espresso beans in separate shallow baing pans and place them in the oven for 8 to 10 minutes or until lightly toasted. Wrap the nuts in a clean disk towel and let cool. Rub the nuts between the cloth or your hands to remove the dark brown skins. Chop the nuts coarsely by hand or in a blender or food processor; grind the espresso beans very finely in a coffee grinder.
……………………
Turn the oven up to 400 F. In a small bowl, combine the milk and brewed espresso. Add the ground espresso beans and set aside. In a large bowl, thoroughly mix the flour, baking powder and salt. Cut in the butter with a pastry blender or 2 knives until the mixture resembles coarse meal.
……………
Add the hazelnuts and brown sugar, mixing lightly just to blend. Add the espresso mixture and stir with a wooden spoon until a soft dough forms. Place the dough on a lightly floured board, knead into a ball and form into a 7-inch round. Cut the round into 6-8 wedges and place them slightly apart on an ungreased baking sheet. Bake for 20 to 25 minutes or until a toothpick inserted in the center of a scone comes out clean. Let cool slightly on a wire rack. Makes 6-8 large scones. Serve warm or at room temperature.

Roasted Butternut Squash Soup and the Colours of Fall


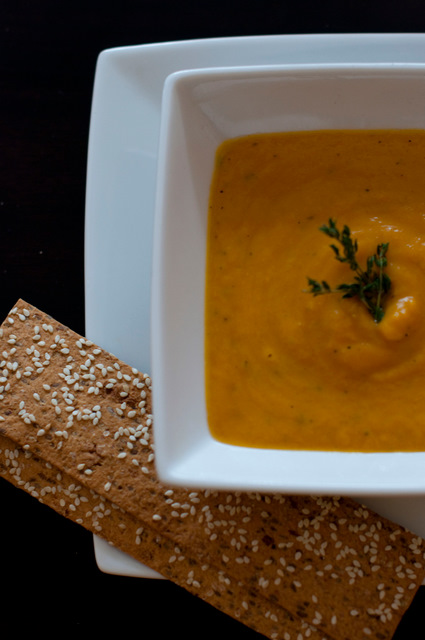
There is something strangely comforting about the fall – its colours, smells and tastes. The warm oranges, browns and yellows, mixed with fallen red leaves line the parks and streets all over the city. These colours are also reflected in one of my favourite fall vegetables – butternut squash. So, it was quite fitting then, when one of my co-workers made butternut squash soup at our annual Halloween pot luck, I was inspired to give it a try myself. Rebecca’s soup was delicious. It was on the sweet side, and she chose to put in a bit of curry and tumeric for taste. I never made butternut squash soup before. I usually just roast the squash and have it as a side dish, so this was going to be a first for me. I decided to make mine slightly more savoury than sweet, and use thyme for spice instead of curry (you may use whatever you want, depending on your taste).

In the recipe, the squash is cooked along with carrots and onions, however, I thought it would be easier to roast the squash first and then add it to the broth. I served it with some Lavash crackers, but any kind of crackers or crostini would work.

Since it was almost end of fall, I decided to capture some of its colours with these gourds, as they complemented the colours of my soup.

The recipe called for two butternut squash, but I purchased one butternut and one buttercup to shake it up a little (yes, I live on the wild side :)). I used half of each kind of squash for the soup and had some of the buttercup squash left over so I roasted it with rosemary and olive oil. I found that the trick in making the soup more savoury was also using half the squash than recommended.

……………………………………………………………………………………………………………..

For high resolution images, please click on each photo.

………………………………………………………………………………………………………………

Recipe

………………………………………………………………………………………………………………

Butternut Squash Soup

Ingredients:
  • 1 Medium carrot – peeled and diced
  • 1 Medium onion – diced
  • 3 cloves garlic chopped
  • 2 butternut squash – peeled and cubed (I used only half of the recommended amount of squash and I found that it gave the soup more of a savoury rather than a sweet taste, as there was less squash and it was more
  • 4 cups of vegetable or chicken broth (I used chicken )
  • 1 1/2 cups of milk (I used less milk. I kept adding more milk until soup reached consistency and creaminess that I wanted, since I used less squash than recommended)
  • 2 tbs olive oil
  • 2 tbs buter
  • 1 tsp tumeric (optional)
  • 1 tsp curry powder (optional – I used fresh thyme)
  • Sea salt and freshly ground pepper to taste
In a stock pot add oil, butter, carrots and onion. Cook for about 10 minutes until carrots are tender. Add garlic and cook for an additional minute. Add butternut squash and broth. simmer for 20 minutes until squash is tender (as I mentioned above, I roasted the squash before, so there was no need to simmer it for this long. I found it was easier to cut the squash once it was roasted). Blend everything with hand-held blender. Add milk and spices to taste and consistency. cook on low heat for 5 minutes. Enjoy!

Pear-Brie Sandwich w Thyme and a Weekend Visit


Every few months my best friend Zirka comes to visit me for a weekend. Zirka’s visits are usually filled with tons of silliness, laughter, boy talk and of course food adventures. My favourite time of the week are weekend mornings, so I decided that for brunch we should have something delightful. I opted to make us Pear and Brie Open Sandwiches with Walnuts, Thyme and Maple Syrup. The inspiration came to me when I found Triple Creme Brie on sale at the grocery store :). Yay!

I must admit that I would never think of putting brie and pear together, especially not with walnuts and maple syrup, but one summer afternoon, I visited the Olson Bakery in Port Dalhousie and decided to taste the combination. I can’t believe I have been missing out on this for so long! I loved it! Their version didn’t have walnuts or thyme, so I decided to add walnuts for crunch, and thyme has such intense aroma that I thought it went perfectly with brie. So, you could say that this version of the sandwich was my little creation :).

Zirka is an adventurous foodie, so she loved my variation of the sandwich 🙂

I used pumpernickel bread in this case, but you’re free to use any type of bread you like – I would think it would go great on a french baguette also!

Needless to say, these pretty sandwiches didn’t last long, especially because that was the first thing we ate that morning 🙂 I would highly recommend the triple creme brie if you can find it, as it adds lots of texture and creaminess to the sandwich. I also used 100% real maple syrup, as here in Canada, it’s abundant and beyond delicious! 🙂

……………………………………………………………………………………………………

For high resolution images, please click on each photo.

…………………………………………………………………………………………………….

Recipe

……………………………………………………………………………………………………

Pear-Brie Sandwich w Walnuts, Maple Syrup and Thyme

  • French Baguette or any other kind of bread you like (I used pumpernickel in this case)
  • Triple Creme Brie
  • 1 Pear (any kind would do)
  • A handful of walnuts
  • 1/4 cup maple syrup
  • Thyme
Cut brie in fairly thick pieces and place on bread. Slice pear in slices and place on top of brie. Turn oven to 450 or 500 degrees. Bake bread with brie and pear for about 5-7 minutes or until brie melts. Alternatively you can put it under the broiler for 3-4 minutes. Add walnuts on top, cover with maple syrup and sprinke thyme. Enjoy!