Category Archives: Dessert

Guilty Pleasures: Lime Cranberry Muffins


Lime Cranberry Muffins

We all have guilty pleasures.  When it comes to food, for me it’s always the baked goods.  Croissants, pastries, breads, muffins – you name it.  Being a girl in her 30s, this is not a good guilty pleasure to have, as you can imagine 🙂  Bakeries are my greatest weakness – the smell of freshly baked bread or croissants – is there anything better in the world?  In  Waterloo, there aren’t many bakeries around (which is maybe a blessing in disguise for my waistline), so the closest I can get to the bakeries back home are cafes and the farmer’s market. 

Lime Cranberry Muffins

This post’s guilty pleasure came unexpectedly from a breakfast visit to the local cafe The Seven Shores.  The Seven Shores promotes the slow food movement and organic local food.  It was founded in 2004 by by local entrepreneurs and eventually evolved to an urban cafe, food market and merchandiser of arts and crafts from artisans around the world.  It was previously located in a small space on Regina and Dupont.  Last December it moved to their new explanded location (previously Generation X).  I have visited the previous location previously and thought the cafe to be a gem: unpretentious atmosphere, friendly staff and amazing pastries. 

Lime Cranberry Muffins

One easy Saturday morning D and I decided to check out the new location.  The first thing that struck me was the amazing countertop they had installed – . thin planks of dark and light wood interchanging to make a sort of striped surface!  The new location is about 3 times the old location with a community room and a small marketplace.  I must say I thought that their old location had a better selection of local produce than what was there now, and I didn’t see any arts and crafts from artisans around the world.  However, this could be due to their recent expansion and not having everything ready yet.  Regardless, we ordered some simple breakfast with eggs, but the real gems were the pastries.  Lime cranberry muffin for D and a strawberry white chocolate scone for me.  Cappucino that I ordered was done perfectly and I was thoroughly impressed by the friendly service.  I had a feeling I was sitting at a cafe somewhere in Europe.

Lime Cranberry Muffins

Lime cranberry muffin – the inspiration for this post – was one of the nicest muffins I have tested in a while – it was fresh, citrusy and light tasting.  The cranberries gave it a slight tartness which was a good complement to the sweetness.  My favourite part was the crystalized pieces of sugar that glistened at the top – super pretty.

Lime Cranberry Muffins

So I decided that I would try to re-create these muffins in my own kitchen.  I found an interesting recipe at My Baking Addiction but it had bluberries instead of cranberries.  I decided to just substitute for cranberries and follow the rest of the recipe.  I wanted the muffins to be super limy so I picked two big limes to zest.  The batter was a lovely light green colour – perfect for spring!  I also put in 50% more cranberries (plus a few on top once in the liners) than what the recipe said.  I bought muffins with cranberries before and many times only found one or two cranberries inside – which is very dissapointing.  So, I decided my muffins would have plenty of cranberries.

The result? Beautiful limey cranberry deliciousness!

Lime Cranberry Muffins

What are your guilty pleasures?  What food can you not live without?  I’d love to hear from you!

…………………………………………………………………………………………………

recipe

………………………………………………………………………………………………….

Lime Cranberry Muffins

  • 1 cup sugar
  • zest of two limes
  • 2 cups all-purpose flour
  • 1/2 teaspoon salt
  • 1/2 teaspoon baking soda
  • 2 eggs
  • 1/2 cup vegetable oil
  • 1 teaspoon vanilla extract
  • 1 cup sour cream
  • 1 cup fresh or frozen blueberries
  • coarse sugar, optional
Directions:
1. Preheat oven to 400 degrees F. Spray muffin pan with nonstick cooking spray or line with paper muffin liners.
2. In a small bowl, combine sugar and lime zest. Mix with clean fingertips until sugar is moistened and fragrant. Set aside.
3. In a medium bowl, stir together flour, salt and baking soda. Set aside.
4. In large bowl, beat eggs and sugar until thoroughly incorporated.  Continue beating while slowly pouring in the oil. Add in vanilla.
5. Stir dry ingredients into egg mixture alternately with sour cream. Gently fold in blueberries. Scoop batter into prepared muffin cups and if desired, top with a sprinkling of coarse sugar.
6. Bake in preheated oven for 20-22 minutes or until a toothpick inserted into middle of muffin comes out dry

Spring Time Baking Fun: Avocado Pound Cake and Profiteroles with Spiced Mango Mojito Sauce


Profiteroles with Mango Mojito Sauce

I love desserts that are light tasting and fruity – especially in the spring. Everything is in bloom, the brighter weather has started – the energy of the spring is here! The brighter weather makes you want to dress in your pretty colourful clothes that have been burried in the back of the closet for what seems like eternity! It makes you want to party!

Profiteroles with Mango Mojito Sauce

My friend Emily has generously offered me a guest post on her very popular blog about fashion and all things pretty – Party Mix Tape.   She said… make something fun, spring-inspired, something that makes you want to party!
So I thought about fun, bright, light-tasting desserts, and the first one that came to mind was Profiteroles with Mango Mojito Sauce. How can you party without Mojitos? And best of all, it’s in a dessert!

Profiteroles with Mango Mojito Sauce

These little babies I found in my favourite cookbook – Bon Appetit Desserts, and I was very intrigued by the mojito mango combination 🙂
The timing was perfect because this last weekend was also the Orthodox Easter, so I told my mom not to worry about dessert – I would be bringing two!

The dough follows the typical profiterole/cream puff instructions – melting butter with milk, adding dough and cooking it on the stove for a few minutes before adding eggs. The dough should come out soft and sticky. If you have an ice cream scoop, it would be the best way to drop these onto a cookie sheet. They will come out even. Make sure to dip the scoop in hot water between each so they come out easier.  The recipe for the puffs may look a bit involved, but the whole process takes less than 1.5 hours, because you can do the filling and the sauce while the profiteroles are baking, and the assembly is done just right before eating.

Profiteroles with Mango Mojito Sauce

I should mention that this dessert also takes a bit of planning – case in point – mangoes. At least 6 mangoes are required and they have to be soft and sweet. So, buy your mangoes well in advance if you can’t find soft ones. Because the profiterole dough has no sugar and the filling very little, most of the sweetness should come from the mango, so it’s even more important that they are ripe and sweet.

I bought my rock hard mangoes a few days ahead, thinking they would soften in time. Well, they didn’t. And, along with a few other things that I forgot about, like taking the butter out to soften, having an electric mixer and forgetting to buy sugar and limes…this fun baking day wasn’t getting off to a good start. The worst thing was that Easter was tomorrow, I promised my mom I would bake, I promised Emily I would have the guest post done this week, and everything was closed tomorrow! Things had to be done in the next 3 hours! For a calm person, I was seriously freaking out.

Profiteroles with Mango Mojito Sauce

D tried to calm me down, and offered to bring his mixer and go look for ripe mangoes. Half an hour later, and luckily for me, he came back with super soft, super sweet mango heaven 🙂 Everything was back on track again 🙂

The profiteroles puff up when they bake, but stay hollow in the middle – perfect for filling. They can stand for 2-3 days but the longer they sit, the harder they get, so they should really get eaten in the first 1-2 days for maximum freshness.

Avocado Pound Cake

The second recipe I picked was the one I found on Epicurious, and it left me quite intrigued. Avocado. In a pound cake? But, after discovering the delicious avocado pudding a few weeks ago, I decided that it was worth a try.

Avocado Pound Cake

The recipe makes a double batch, and I believe the dough can keep for a few days, or be frozen.
This loaf is the perfect way to use up your ripe mushy avocados (if you don’t want guacamole), and you can use some on top for decoration. My favourite thing about this loaf is that it’s lime green inside – so pretty and so much fun! It’s very moist – perfect for having with tea.

Avocado Pound Cake

I’m excited for the spring and the warm weather and bike rides.

Until next time, happy eating!

Toodles

Avocado Pound Cake

Update:  Check out my guest post on Emily’s PartyMixTape – HERE

…………………………………………………………………………………………………………..

Click on each photo to view the high resolution images.

…………………………………………………………………………………………………………..

RECIPES

…………………………………………………………………………………………………………..

Avocado Pound Cake

Ingredients:
  • 3 cups all-purpose flour
  • 1/2 cup yellow cornmeal
  • 1/2 teaspoon salt
  • 1 1/2 teaspoons baking powder
  • 1 1/2 teaspoons baking soda
  • 3/4 cup (1 1/2 sticks) unsalted butter, softened
  • 3 cups granulated sugar
  • 1 cup plus 2 tablespoons ripe mashed avocados
  • 4 large eggs
  • 2 teaspoons pure vanilla extract
  • 3/4 cup buttermilk
Place a rack in the center and upper third of the oven and preheat to 350 degrees F. Grease and flour two 9×5-inch loaf pans and set aside.  In a medium bowl, whisk together flour, cornmeal, salt, baking powder, and baking soda. Set aside.
 
In the bowl of an electric stand mixer fitted with a paddle attachment, beat butter and sugar on medium speed until light and fluffy, 3 to 5 minutes. Add avocado and beat for another 2 minutes. Stop mixer and scrape down the sides of the bowl as necessary.
 
Add eggs, one at a time, beating on medium speed for 1 minute after each addition. Stop the mixer and scrape down to make sure everything is thoroughly mixed. Beat in vanilla.
 
With the mixer on low speed, add half of the flour mixture. Beat until just incorporated. Add the buttermilk and the remaining flour mixture. Beat until just incorporated. Remove bowl from the stand mixer, and finish incorporating the batter with a spatula.
 
Divide the batter between the pans and bake on alternating racks for 30 minutes. After 30 minutes, rotate racks and bake for another 15 to 25 minutes, or until a skewer inserted in the center comes out clean. Let cool in pans for 20 minutes before inverting onto a wire rack to cool completely.
 
Cake will last, well wrapped, at room temperature for up to 4 days.

…………………………………………………………………………………………………………….

Mango Profiteroles with Mango Mojito Sauce

Ingredients:
Puffs
  • 1 cup whole milk
  • 1/2 cup (1 stick) unsalted butter, diced
  • 1/4 teaspoon salt
  • 3/4 cup all purpose flour
  • 4 large eggs
  • 2 large egg yolks
Filling
  • 2 cups 1/3-inch cubes peeled pitted mango (from about 4 large; see Test-Kitchen Tip below for details)
  • 1 cup chilled sour cream
  • 1 cup chilled whipping cream
  • 1 cup powdered sugar, divided
Spiced Mango-Mojito Sauce
  • 2 large mangoes, peeled, pitted, diced
  • 6 tablespoons plain whole-milk yogurt
  • 4 tablespoons (or more) sugar
  • 3 tablespoons spiced rum
  • 1 tablespoon fresh Key lime juice
  • 1 1/2 teaspoons (packed) finely chopped fresh mint
Preparation:
Profiteroles:
Preheat oven to 375°F. Line 2 large rimmed baking sheets with parchment paper. Bring milk, butter, and salt to boil in heavy large saucepan over medium-high heat, stirring until butter melts. Add flour all at once. Reduce heat to medium and stir with wooden spoon until dough forms ball and some batter films bottom of pan thickly, about 4 minutes. Transfer dough to medium bowl and cool 5 minutes. Using electric mixer, beat in eggs and yolks 1 at a time.
Drop dough by generous tablespoonfuls 3 inches apart onto baking sheets, making about 24 puffs. Smooth tops with wet fingertips.
Bake puffs 15 minutes. Reverse sheets and bake puffs until deep golden, about 10 minutes longer. Make small slit in side of each puff. Return to oven, turn off heat, and let dry 15 minutes. (Can be made 6 hours ahead. Let stand at room temperature.)
 
Filling:
Stir mango and sour cream in medium bowl to blend. Beat whipping cream and 1/2 cup powdered sugar in large bowl until peaks form. Fold whipped cream into mango mixture. Cover bowl; refrigerate filling at least 30 minutes and up to 3 hours.
Cut cream puffs horizontally in half. Spoon heaping tablespoon filling into each bottom half; cover with tops. Sift remaining 1/2 cup powdered sugar over.
Divide cream puffs among 8 plates. Spoon sauce onto plates and serve.
 
Spicy Mango-Mojito Sauce
Purée mangoes in blender or processor until smooth. Transfer 1 1/2 cups purée to medium bowl (reserve remaining purée for another use). Mix yogurt, 4 tablespoons sugar, spiced rum, fresh lime juice, and chopped mint into purée. Sweeten sauce to taste with more sugar, if desired. (Can be made 1 day ahead. Cover and refrigerate.)

Tapas Weekend, with Farmer’s Market Salad and Hazelnut Shortbread with Chocolate


Tapas. My new favourite style of dinner. Simple to prepare, lots of variety, and a great way to try a little bit of everything 🙂
A preferred way to have meals in Spain, as well as some parts of the US and the UK, tapas (from Spanish word tapar meaning ‘to cover’) are meant to encourage socializing and conversation, with no pressure to finish a big meal.

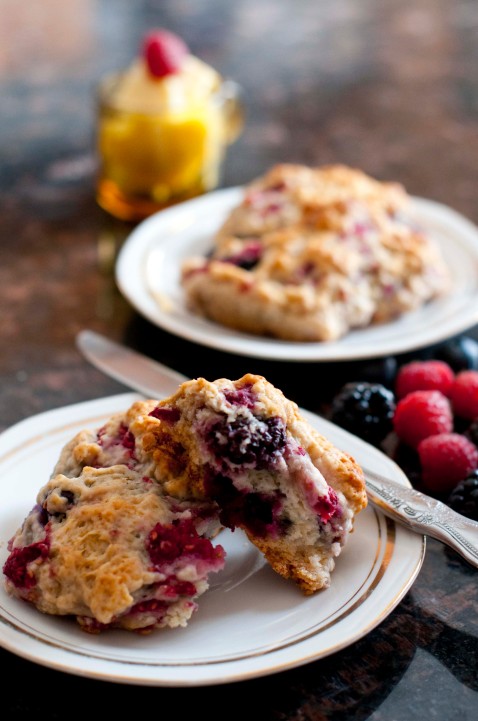
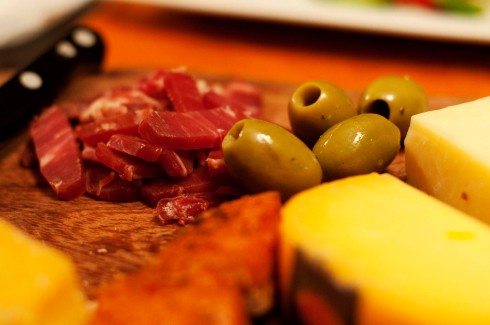
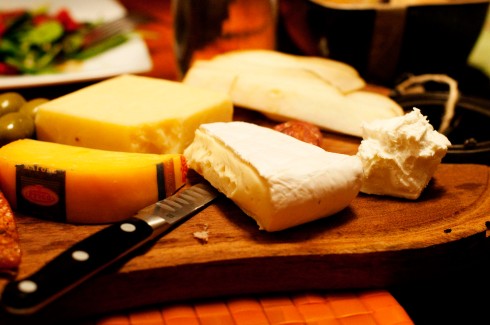
It all started on Friday when our little group got together for dinner and somewhere along the way it was decided that it would be tapas style: different cheeses, spreads, fresh bread, olives, and best of all, Stan’s famous mussles in cream sauce, Christina’s garlic shrimp, DVG’s crostini with goat cheese, prosciutto and cranberry sauce and my crostini with cheddar, pear and walnuts.

I would say one of the most important parts of having good tapas is fresh bread. For Friday, we visited the new German Bakery in Uptown – German Baked Specialities, and got some fresh baguette for the crostinis and rye with corn flour crust for dipping.  Another important ingredient for tapas is good olive oil. Sometimes, all one needs is good quality olive oil and balsamic vinegar for dipping with fresh bread!

There is something magical about old friends coming together after not seeing each other for a while, and picking up right where they left off. Conversation is flowing, the food is dissapearing and the wine bottles are getting empty.  Before you know it, you have been chatting and eating for hours! Is there anything better in the world than great friends, great food and great wine?

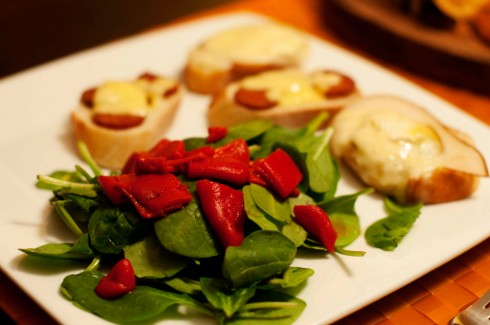
Aged and young gouda, double creme brie, aged cheddar, chevre, olives, pears, sausages, smoked trout…

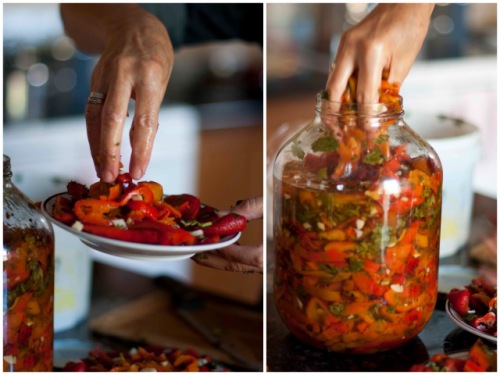
Inspired by the success of Friday night tapa’s dinner, DVG and I decided to have a repeat of it on Sunday evening. Again, we went all out, put the whole spread on my new serving board from Argentina (horse shoes for handles?! So cool!), made different versions of crostinis and at 22h, dinner began!

We discovered we had some aged white cheddar in the fridge, and had initially intended to melt it with pear, but after tasting it, we realized it was too delicate and delicious to melt, so instead we cut up the remaining pear and had it fresh with the aged cheddar.  Such a great combination!

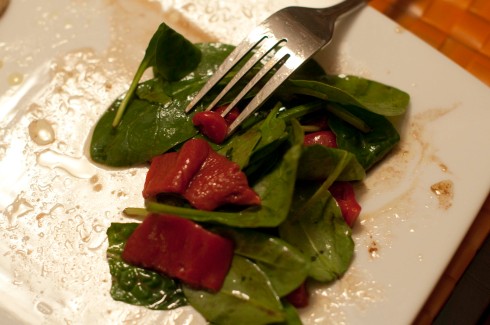
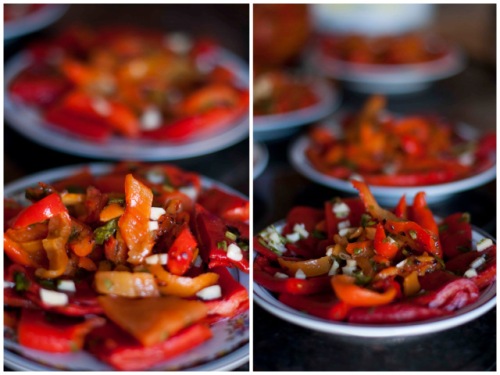
All that cheese and bread, we had to had some greens to balance out the ‘food equation’ 🙂  I found that the quickest way to make a delicious dressing is to mix olive oil, balsamic vinegar, dijon mustard and salt and pepper in a mason jar and cover some baby spinach or arugula with it.  The roasted red peppers add a splash of colour and a different texture to the salad.

DVG proved to be a great model for my photo whims, even having enough patience for my meticulous framing, and that’s saying a lot especially because we were both famished and tired from climbing!

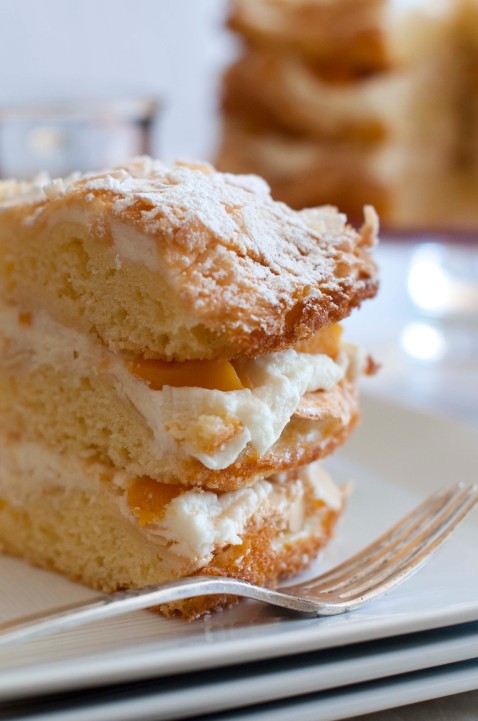
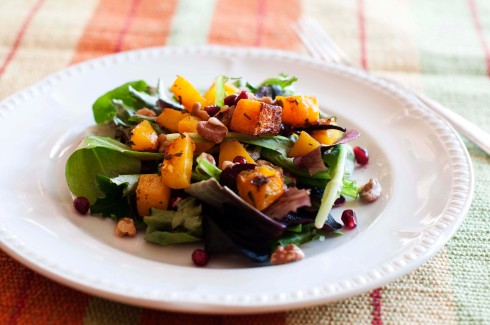
The rest of Sunday afternoon was spent preparing a salad and cookies for a dinner party hosted by my mom.  My mom is an excellent cook – she whips up meals in what seems like seconds, and they are always delicious.  I consider her culinary skills far superior to my own.  And yet, sometimes when she is hosting dinner parties she asks me to prepare something ‘delicious’ and ‘decorative’, to impress her guests.  Even though, whatever she prepares is sure to be yummier :).  But, I take this as a compliment, and oblige whenever she makes such requests.

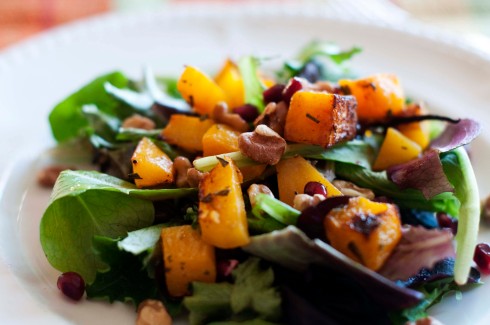
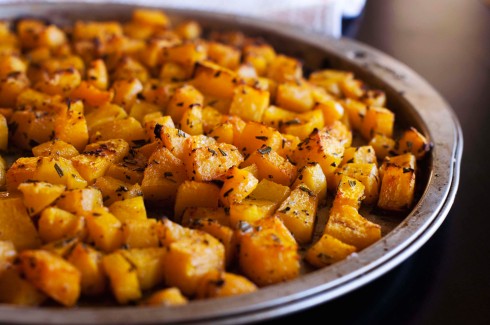
A few weeks ago, while searching for a different recipe, I came upon this one for Farmer’s Market Salad, and judging by the ingredients, it seemed like a very interesting combination of flavours.  There is roasted squash, walnuts and arugula, the most interesting was pomogranate seeds, and pomogranate molasses.  Tanginess of the pomogranate seeds was a great compliment to the caramelized squash, crunchiness of walnuts and lightness of the arugula.

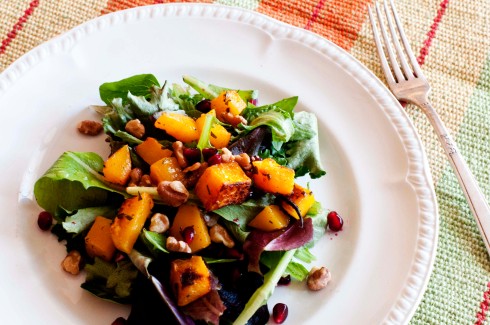
Even though recipe didn’t call for this, I broiled the squash a bit after roasting it to get the charred tops, and also added fresh rosemary to the squash before roasting for extra flavour. 

The dressing for this salad is super simple – orange juice, lemon juice and walnut oil (or any other type of nut oil), seasoned with salt and pepper.  I liked the acidity of the juices combined with the smooth taste of the oil, it gave the salad a fresh and light taste.  The recipe also calls for the salad to be topped off by pomogranate molasses.  Apparently, this can be found in some supermarkets, but I failed to find it, so instead I improvised.  Half the pomogranate was seeded for the salad and half was seeded to make a sauce (a makeshift molasses if you will).  I really didn’t quite know what I was doing here, but I tried to reduce the juice from the seeds to a sauce and added some regular molases and butter.  The sauce turned out ok, but I don’t know how it compares to the real thing.

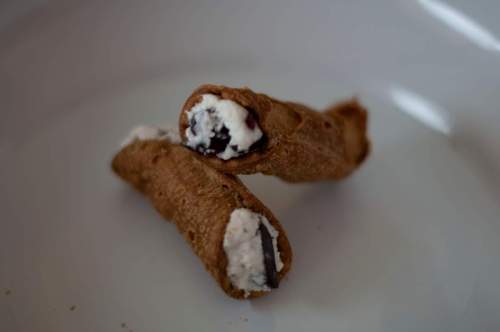
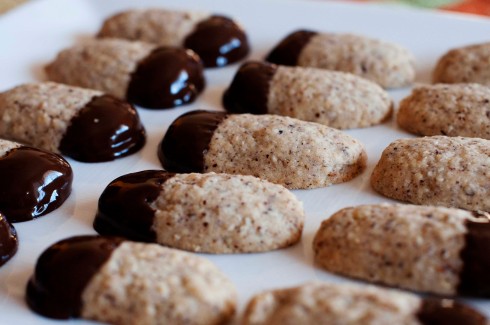
For dessert, I decided to make these simple hazelnut shorbreads that are especially decorative because they’re half dipped in chocolate.  I find them to be super easy to make, and always a hit.  They are soft and crumbly and the creamy chocolate taste is a nice contrast to the dryness of shortbread.

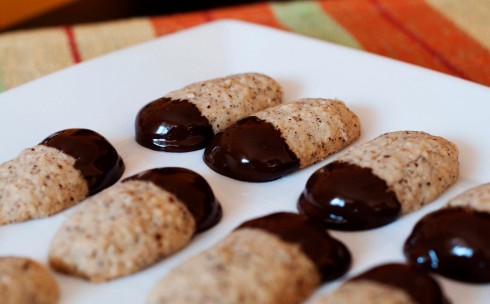
I would recommend shaping these on the smaller side before you bake them (about the size of half of your finger), because they grow, and they are much more decorative if they are smaller.

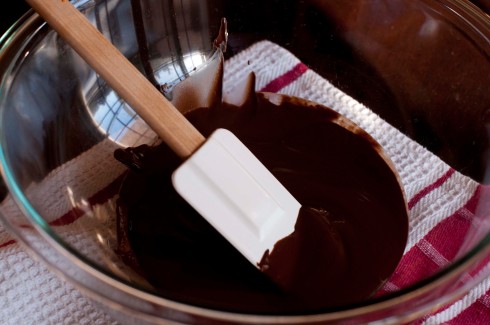
Another tip, which may seem obvious, but it wasn’t to me when I first made these, is to transfer the melted chocolate into a deep container with a bigger opening ( a mug would work) as this makes it easier to dip the shortbread at the right angle.

…………………………………………………………………………………………………………..

Click on each photo to view the high resolution images.

…………………………………………………………………………………………………………..

RECIPES

…………………………………………………………………………………………………………..

Farmer’s Market Salad

Ingredients:
  • 4 1/2 to 5 cups 1/2-inch cubes peeled seeded butternut squash (from about one 2-pound squash)
  • 2 tablespoons extra-virgin olive oil
  • Pinch of dried crushed red pepper
  • Coarse kosher salt
  • 2 tablespoons orange juice
  • 1 1/2 tablespoons walnut oil or other nut oil
  • 1 1/2 teaspoons fresh lemon juice
  • 4 ounces arugula (about 8 cups lightly packed)
  • 1/2 cup walnuts,toasted, coarsely chopped
  • 1/2 cup pomegranate seeds
  • 2 teaspoons pomegranate molasses*
Preheat oven to 450°F. Toss squash, olive oil, and crushed red pepper on large rimmed baking sheet. Sprinkle with coarse salt. Roast 15 minutes. Using spatula, turn squash over. Roast until edges are browned and squash is tender, about 15 minutes longer. Sprinkle with coarse salt. DO AHEAD: Can be made 2 hours ahead. Let stand at room temperature.
 
Whisk orange juice, walnut oil, and lemon juice in large shallow bowl. Season to taste with salt and pepper. Add arugula, walnuts, and pomegranate seeds; toss to coat. Season to taste with coarse salt and pepper. Spoon warm or roomtemperature squash over salad. Drizzle with pomegranate molasses and serve.
 
* A thick pomegranate syrup; available at some supermarkets and at Middle Eastern markets
…………………………………………………………………………………………………………..
 

Chocolate Dipped Hazelnut Shortbread

Ingredients:
  • 1 cup husked hazelnuts
  • 1 cup all purpose flour
  • 1/2 teaspoon baking powder
  • 1/2 teaspoon salt
  • 8 tablespoons (1 stick) butter, room temperature
  • 1/3 cup sugar
  • 1 egg
  • 1 teaspoon vanilla extract
  • 4 ounces good-quality semisweet chocolate
Preheat oven to 350 degrees F.
 
Place hazelnuts on baking sheet. Bake until they’re a shade darker and fragrant, about 10 to 15 minutes. Remove from oven and set aside to cool.
 
Lower oven to 325 degrees F.
 
Place hazelnuts in blender or food processor and pulse to coarse bits; set aside. Whisk together flour, baking powder, and salt to blend; set aside.
 
Beat butter and sugar together with a wooden spoon until smooth. Beat in egg. Gradually beat the flour mixture into the butter mixture. Add the chopped hazelnuts and mix until distributed evenly throughout.
 
 Form into finger sized logs, about 1 1/2 to 2 tablespoons dough each, and place on greased cookie sheets. Bake until firm, about 15 minutes. Remove from oven and cool on racks.
 
In a saucepan over lowest heat or in a double broiler, melt chocolate. Dip 1 end of cooled cookies into melted chocolate. Place back on cookie sheet to harden.
 

Triple Chocolate Truffle Tart with Raspberries for Mom


“How old are you today, mom?” 56 she says. And adds how she’s getting old. But then later that day she calls in a panic that she miscounted and really she’s 57! “I’m old” she says. I start laughing.  My mom is cute.   And always brutally honest.  But that’s part of her charm – at least one always knows how she really feels :). Once she mentioned that no one has ever baked her a cake of any sort for her birthday. And I thought to myself, that’s not right – my dear mommy deserved better than that :).   So, instead of traditional cake, I decided to make her a tart.

The Triple Chocolate tart is just that – very chocolatey, cocoa is baked into the crust and the filling is a mixture of white and dark chocolate. The tarness and slight sourness of the raspberries break up the sweetness of the chocolate and balance out the sugar in the tart and add a fresheness to it.

I found scotch to be a good combination to sip along with this tart, and you can even go as far as to infuse the raspberries into the scotch.

After the crust is baked, and raspberries are set on the bottom of the tart, the chocolate mixtures are poured over and have to set for a few hours. I found the white chocolate took longer to set. Needless to say, the tart has to be refrigerated and covered so that the crust doesn’t dry out. I found the crust to be challenging to spread out, it was breaking and it needed a lot of flour to keep it from sticking. The parchment paper really helps in transferring from the board to the tart pan – definitely a good investment that parchment paper! 🙂

We put one single candle into the tart for my mom to blow out (we didn’t want to remind her how old she actually was :)).  She was so happy to have the whole family there – she always complains how we don’t spend enough time together and how we don’t talk enough. I was just happy that I fulfilled a long-time wish of hers and that the tart actually turned out.

It feels like forever ago that I’ve baked something and I almost forgot how great it feels to look at the finished product and even better to photograph it. Not to mention the incredible smell that fills my entire house 🙂
Until next time, toodles!

…………………………………………………………………………………………………………..

Click on each photo to view the high resolution images.

…………………………………………………………………………………………………………..

RECIPE

…………………………………………………………………………………………………………..

Triple Chocolate Truffle Tart with Raspberries

Chocolate Pastry:
  • 1 cup (250 mL) flour
  • 1/4 cup (50 mL) cocoa
  • 3 tbsp (45 mL) granulated sugar
  • 1/2 cup (125 mL) unsalted butter
  • 3 tbsp (45 mL) orange juice
Filling:
  • 1 1/4 cups (300 mL) whipping cream
  • 3 oz (90 g) white chocolate
  • 8 oz (250 g) bittersweet chocolate, chopped
  • 2 tbsp (25 mL) butter
  • 2 cups (500 mL) raspberries
 
  1. In a food processor, gently combine flour, cocoa, sugar and butter until mixture is just crumbly. Add enough orange juice for mixture to come together. Remove from food processor and form into a ball. Flatten slightly, wrap in plastic wrap and refrigerate for 30 minutes.
  2. Remove pastry from refrigerator and roll out on floured board until 1/4-inch (5-mm) thick. Place in 10-inch (25-cm) tart or flan pan with removable bottom or four 4-inch (10-cm) individual tart tins. Prick base.
  3. Place a sheet of parchment paper or foil over pastry and weight with beans or rice. Bake at 350ºF (180ºC) for 10 minutes, remove beans and rice and bake for another 10 to 15 minutes or until cooked through. Cool.
  4. For filling: bring cream to boil in a medium pot. Remove from heat and remove 1/2 cup (125 mL) cream to another bowl. Stir white chocolate into the cream in bowl and bittersweet chocolate into the pot. Stir until chocolates are melted. Stir 2 tsp (10 mL) butter into white chocolate and remaining into dark chocolate. Reserve.
  5. Scatter raspberries over the bottom of tart shell. Pour over dark chocolate cream. Swirl through white chocolate cream. Garnish with more raspberries, if desired. Chill to set slightly.
 

Lavender Cookies


Lavender. What do you think about when you smell it? Spring? Freshness? Or perhaps shortbread cookies? This post was inspired by several different memories, all of them involving lavender…and I thought what better way to make a keepsake?

Has it ever happened to you that you meet someone and don’t think much of it, until he/she does something that you didn’t expect – pleasantly surprising you in the process, and from that point forward you see him/her in a completely different light? For me, it’s always about the small gestures of kindness and the thought behind it, and this one was no different. A few years back I had a pleasure of meeting a French exchange student that started playing on our varsity soccer team. One day I had a gathering at my house for all the soccer buddies and I invited Victor and his friends to also come along. I had very brief interactions with him before that. On the day of the party, he brought a small gift for me. It was a sachet of dried lavender that his mom made from the lavender that grew around their house in France. It bore the name of their estate. He said it was to be put in my closet to make my clothes smell nicely. Since then I have kept it, and it is featured in this post. Thank you Victor for showing me that life is all about the small gestures of kindness!

Another lavender related memory, a more recent one was from last weekend when my best friend Z came to visit. Z’s visits are like food to the soul – always so much laughter and fun! Recently, also much of reflection and self-discovery.
Among our many adventures over the two days, one of them was a quest to find a bunch of lavender. I had already invisioned what this post would look like and a bunch of lavender was essential. Apparently, tis not the season for lavender yet, so we had a hard time finding it, and this post was almost pushed for later in the summer. Z wanted to go ‘antiquing’ in Cambridge, and I’m glad we did, cause she found awesome clogs and an interesting clock…and just when we weren’t expecting it, in a flower shop close by, we found a bunch of lavender also! I guess it was meant to be 🙂

So, it’s the end of May and I can count the number of sunny days on one hand in this month! That is probably the reason I didn’t have more posts this month…natural light was very bland. This past Sunday I got lucky for a few hours in the morning with some sunshine and decided to make the best of it. The sun was hiding behind the clouds from time to time, which actually worked out perfectly cause I needed the bright sunlight softened down. The lavender lends itself so easily to photos, the colour is so vibrant.

The cookies themselves are quite easy to make….the list of ingredients is small, and most of these things you would most likely already have in your pantry. Aside from perhaps lavender, although it’s readily available (the actual buds are, but if you’re as determined as me to find an actual bunch of lavender, this may take a little while longer :)). The lavender gives the shortbread based cookies quite an interesting flavour. I wonder what the fresh buds would taste like and if they would be much different from the dried ones. Regardless, they are quite decorative…and you may choose to make them all different shapes…I just found a round-edged square to be interesting for me 🙂 Happy Spring!

…………………………………………………………………………………………………………..

Click on each photo to view the high resolution images.

…………………………………………………………………………………………………………..

RECIPES

…………………………………………………………………………………………………………..

Lavender Cookies

  • 1 cup (250 mL) unsalted butter, at room temperature
  • 1/4 cup (50 mL) granulated sugar, plus more for sprinkling on top
  • 5 tbsp (70 mL) icing sugar
  • 2 cups (500 mL) all-purpose flour
  • 2 tbsp (25 mL) finely chopped fresh lavender flowers
  • 1/8 tsp (0.5 mL) salt
 
  1. Cream butter until light and fluffy. Gradually beat in sugars, then flour, lavender and salt. Form into a round flat cake, wrap with waxed paper and refrigerate for an hour. Coat baking sheet with nonstick spray or line with parchment paper.
  2. Preheat oven to 350°F (180°C). Roll out dough on a floured surface to 1/4-inch (5-mm) thickness. Cut with a 2- to 2 1/2-inch (5- to 6-cm) cookie cutter and transfer to baking sheet about 1-inch (2.5-cm) apart. Prick each cookie with a fork and dust lightly with granulated sugar. Bake 10 to 12 minutes or until lightly coloured. Remove from sheet, cool on a rack and store in an airtight container.
Makes 24 cookies


Easter Joy and Homemade Orange Honey Butter


When I was little, Easter was one of my favorite holidays. It was one of the signs that spring was upon us, flowers and trees in bloom, and we were that much closer to summer! But, more than that, it was the joy of preparing for it, watching my mom colour the eggs, collecting little pieces of grass (more on this later), and of course, the game of trying to compete for most eggs! Back home in Bosnia, we didn’t have Easter egg hunts. Instead we played the game of trying to break each other’s egg. The person with the stronger egg wins the loser’s egg, and at the end of the day, the winner gets bragging rights! For us kids, this was huge! 🙂

My mom has always been a fan of doing things the natural way, and this also applied with colouring the eggs. Instead of using artificial colours and stickers, my mom gets way more creative than that 🙂 She collects skins from red onions all year long to have to use for Easter, and boils the eggs in onion skins, so that they get this rich burgundy colour that you see in the pictures. The patterns come from flowers or interesting-shaped pieces of grass/weeds that get affixed to the egg and secured with old stockings. The eggs are then boiled for a long time and at the end, stockings and flowers are removed to show the pattern. Incredible!

This Easter I also decided to make these berry scones, recipe developed by Tyler Lawrence. He calls them the Ultimate Berry Scones 🙂 And believe me, they are divine! The scones come with homemade orange honey butter. Yes, homemade! So, before trying this recipe I have never made my own butter, and actually had no idea that this is possible to do in my own kitchen! But, it’s actually, quite simple! You overwhip whipped cream! Eventually, the butter separates from the buttermilk. You squeeze out the buttermilk from the butter and refrigerate! Voila! Homemade butter. The recipe suggests doing it ‘the old fashioned way’ but putting the cream in a mason jar and shaking it, but I wouldn’t recommend this because it would take a very long time.  Also, the recipe uses the food processor a lot, but if you don’t have a food processor, whipping the cream with regular mixer works just as well, it just takes slightly longer.  The orange zest in this recipe really gives the butter an extra dimension of flavour.

The scones are actually quite easy to make, not many ingredients, and the freshly squeezed orange-honey buttermilk makes them very moist. Needless to say, they were quickly gone at breakfast :). 

For dessert, I decided to make a chocolate cake. The interesting thing about this cake was that the layers are mostly made from beaten eggs, very little flour is used. The one thing that I would advise is that it’s absolutely crucial to bake the two crusts at the same time. Because most of the batter comes from the beaten eggs, if they are left to sit for any period of time, they will deflate and you’ll have a very dense and flat crust 😦

…………………………………………………………………………………………………………..

Click on each photo to view the high resolution images.

…………………………………………………………………………………………………………..

RECIPES

…………………………………………………………………………………………………………..

Orange Honey Butter:

  • 1 quart heavy cream
  • Zest of 1 orange
  • 1/2 cup honey
  • Pinch of salt

Berry Buttermilk Scones:

  • 2 cups all-purpose flour
  • 3 tablespoons sugar, plus more for sprinkling scones
  • 1 tablespoon baking powder
  • 1 teaspoon baking soda
  • 3/4 teaspoon kosher salt
  • 3/4 stick cold unsalted butter, cubed
  • 1 1/2 cups fresh mixed berries (e.g. blueberries, raspberries, blackberries), washed and dried
  • 3/4 cup buttermilk, (leftover from orange butter), plus more to brush scones
Directions
You can do this the old fashioned way and add ingredients to a mason jar, cover with the lid and shake vigorously for 10 minutes, or you can use the food processor.
 In a food processor bowl add all the ingredients and turn on high. The liquid will slosh, whip and then separate after about 4 minutes. When the mixture separates, (these are the butter solids and buttermilk), stop processing and strain out the buttermilk – there will be just under a cup. Reserve the buttermilk to make the scones. Strain out the butter and squeeze dry. Work the butter a couple of times to bring it together to form a nice ball. Refrigerate butter until ready to use.
 For the scones:
Preheat oven to 400 degrees F.
 In a food processor bowl add flour, sugar, baking powder, baking soda and salt. Add cold butter cubes and pulse until you have the texture of coarse bread crumbs. Transfer to a large mixing bowl, then add 3/4 cup of buttermilk and stir to combine. As it comes together add berries and fold dough to incorporate berries but not break them up too much.
 Drop spoonfuls of dough onto a parchment lined sheet pan.  Using a pastry brush, paint the tops of each scone lightly with buttermilk and sprinkle with sugar.
 Bake until golden brown, and nice and puffy, about 17 to 20 minutes. Remove from the oven and transfer to a wire rack.
 Serve warm with the Orange Honey Butter.

© The Food Network

The Black and Tan Cake

  • 4 oz (125 g) bittersweet chocolate, chopped
  • 2 tbsp (25 mL) butter
  • 8 eggs
  • ¾ cup (175 mL) salted roasted peanuts
  • ¾ cup (175 mL) all-purpose flour
  • 1 cup (250 mL) granulated sugar
  • 1 tsp (5 mL) vanilla
2 tbsp (25 mL) cornstarch

Ganache

  • 2/3 cup (150 mL) whipping cream
  • 6 oz (175 g) bittersweet chocolate, chopped
  • Chopped salted roasted peanuts, for garnish
1. Preheat the oven to 350ºF (180ºC).
2. Line the bottom of two 9-inch (23-cm) cake pans with a circle of parchment paper. Set aside.
3. Melt chocolate and butter in a saucepan over low heat; set aside. Place eggs (in shells) in a bowl and cover with warm water; let eggs warm to slightly above room temperature, refreshing with more warm water if it cools.
4. Pulse peanuts in a food processor until finely chopped (but not a paste). Add flour; pulse to combine. Set aside.
5. Drain water from eggs and crack into a large, straight-sided bowl. Add sugar. Using an electric mixer, beat until very pale, tripled in volume and ribbons fall slowly from beater when lifted. Beat in vanilla. Sprinkle with peanut mixture in 2 additions, folding just until combined.
6. Pour half of batter into a separate bowl. Working with 1 bowl of batter, sift in cornstarch and gently fold just until blended. Pour into 1 prepared pan. Gently fold melted chocolate mixture into second bowl of batter. Pour into remaining pan.
7. Bake for about 25 to 30 minutes or just until a tester inserted in the centre comes out clean. Let cool in pans on rack for 30 minutes. Run a knife around edge of cakes and invert onto rack. Peel off paper and let cool completely.
8. For ganache, heat cream in a saucepan over medium heat, just until bubbles form around the edge. Remove from heat and stir in chocolate until melted and smooth. Let cool until slightly thickened but still fluid.
9. To assemble, place chocolate cake layer on a serving plate. Pour about ½ cup (125 mL) of the ganache in the centre of cake and spread almost to the edges. Top with peanut cake layer. Slowly pour remaining ganache in the centre of the cake, gently tilting as necessary to spread
ganache to the edges and letting drips flow down sides of cake. Sprinkle with chopped peanuts. Refrigerate for about 15 minutes or until ganache is set or for up to 1 day. Cut into slices using a warm, serrated knife.
 
Serves 10 to 12
 

Lazy Sunday with Berlin Air Cake


Sunday morning is my favourite time of the week. It’s not a market day, work day or a school day. There’s no need to run anywhere or wake up early. Perfect for lounging, taking extra time to get out of bed and even longer to have the morning coffee and breakfast. And to top it all off, this Sunday was perfectly sunny – it made my living room nice and warm and so incredibly bright!
Igor was coming over to study in the late morning, so I decided make us some croissants and cappucinos for breakfast. Mmmm…the smell of warm croissants – is there anything better when you’re hungry?

So, I’ve been eyeing this cake on the front page of LCBO’s Food and Drink magazine for a few months now, and Sunday seemed to be a perfect day to try it. So, I decided that while Igor was studying, I’d make this beautiful piece of dessert 🙂 I underestimated the amount of time it would take to make it, so by the time I was finished, I had run out of good daylight…so the pictures had to wait until the next day. I think it would have gone faster had I had three same size cake pans. I only had one, so I had to bake each crust separately…so just the baking alone took 1.5 hours. I must say though, the way it turned out, all the work was so totally worth it!

I also really enjoyed the name of this cake – Berlin Air 🙂 I wonder how that came about. I thought in addition to it being a delicious cake, it could also be a sweet temptation and a greeting to all my dear friends in Berlin 🙂 Of course, leave it to Isabeau to ask if the cake can fly! 🙂 🙂 Well, sure, I said, I could fly – if you threw it at someone 🙂
Ha ha ha!

Other than the fact that this cake takes some time to make (but if you had 3 cake pans, it would take 1/3 of the time), it was actually pretty easy. The crust is simple, and the rest is just a lot of whipping cream. It seems that the “Whip It” stabilizer is quite important because otherwise the whipped cream wouldn’t hold its shape for longer periods. The cake also should be consumed almost immediately, so make sure you share it with your friends and family!
Happy eating! ’till next time – cheerio!

…………………………………………………………………………………………………………..

Click on each photo to view the high resolution images.

…………………………………………………………………………………………………………..

RECIPE

…………………………………………………………………………………………………………..

Berlin Air Cake

Cake

  • 6 eggs, separated
  • ¾ cup (175 mL) unsalted butter
  • 1¾ cups (425 mL) granulated sugar, divided
  • 1¾ cups (425 mL) all-purpose flour
  • 1 tsp (5 mL) baking powder
  • ½ tsp (2 mL) salt
  • ½ cup (125 mL) milk
  • ¾ tsp (4 mL) pure vanilla extract
  • ¼ tsp (1 mL) cream of tartar
  • ¾ cup (175 mL) sliced almonds

Filling

  • 1 cup (250 mL) drained canned peaches or mandarin oranges
  • 1 cup (250 mL) whipping cream
  • 1 envelope (10 g) Dr. Oetker Whip it
  • 2 tbsp (25 mL) granulated sugar
  • ½ tsp (2 mL) icing sugar

1. Preheat oven to 325°F (160°C). Use three 9-inch (23-cm) springform pans or use cake tins lined with enough foil to overlap sides (to be used to lift cakes out); coat pan insides with spray. Separate eggs; set whites aside.

2. Using electric beaters, cream butter with ¾ cup (175 mL) sugar for 5 minutes, or until quite fluffy. Beat in egg yolks 1 at a time. Stir flour with baking powder and salt. Stir milk with vanilla. Using a spatula, stir a third of flour mixture into butter mixture; then stir in half of milk mixture. Repeat; then finish with final third of flour mixture. Divide batter between pans; spread out dough and smooth tops.

3 Using a clean bowl and clean beaters, whip egg whites and cream of tartar until soft peaks form when beaters are lifted. While beating, slowly add remaining 1 cup (250 mL) sugar. Continue to beat until whites are stiff and glossy. Dividing equally, spread over batter in pans; sprinkle with almonds.

4. Bake in centre of oven for 30 minutes or until top is lightly golden and a cake tester inserted in centre comes out clean. Cool on a rack for 10 minutes; then remove cakes from pans. Place back on rack to cool completely. (Baked cakes can be kept uncovered at room temperature for up to half a day.)

5. To assemble cake, coarsely chop well-drained peaches (or oranges). Pour whipping cream and Whip it into a cold mixing bowl; add 2tbsp (25mL) sugar. Whip cream with electric beaters until firm peaks form when beaters are lifted.

6. Set aside best-looking cake round for top layer. Place 1 round on cake plate; spread with half of cream. Dot with half of fruit. Top with another round. Repeat with cream and fruit.

7. Finally add reserved top layer. Lightly sift icing sugar over top. Uncovered, cake keeps well at room temperature for several hours, but other wise cannot be prepared ahead or frozen.

Serves 10 to 12

© LCBO Food and Drink Magazine

Honey-Roasted Peach Croustade with Almonds and Honey-Sweetened Greek Yoghurt


The Yummy Pixel

First post of 2011.  Happy New Year!  What were your New Year’s resolutions?  I haven’t thought about mine because I usually never keep them anyway, so why put all the pressure on myself? :).  One thing that I’m sure I’ll keep up with is this blog.  Over the holidays, I purchased (and at half price – yay!) the new Bon Appètit Desserts cookbook , and I just couldn’t wait to try one of 100s of recipes in it!  This cookbook is divine – there are so many different variations on the classic favourites and numerous butter pastry options (which I love).  When I first saw this book at the bookstore, I opened it to exactly the page of this Honey-Roasted Peach Croustade.  It looked so delicious and right away I started thinking about how I would photograph it, the angles, the accessories, etc.  So, what you will see here are some of those thoughts – in photos of course :).

I was lucky that the tree-rippened peaches were on sale yesterday when I went to buy them.  I haven’t roasted peaches before so  I wasn’t sure what to expect.  The honey and brown sugar that get sprinkled on the peaches before they roast make a brown, sticky, bubbling paste around the peaches, and my whole kitchen started smelling like peach-infused honey – YUM!


The peaches were so bubbly and soft when they came out of the oven I couldn’t resist taking a picture.  It was such a beautiful day yesterday and SO much light was coming through my big window, it was threatening my photos being too bright.  Let’s face it – I’m an amateur and I barely scraped enough money for my fancy D90, so softboxes and light reflectors are not part of my equipment (unfortunately).  I try to shoot mostly during the day, as I find that daylight best preserves the natural food colours.  Since there was so much light coming through my windows, I had to use my blinds to soften it. 

I must say I’m fairly pleased with the results because I’m not noticing too many shadows or reflections, and it seems to me that the source of light is not too obvious (or maybe my eye is just not trained enough).

  I just love the smell of roasted almonds, and especially how their colour compliments the baked pastry dough.  The recipe doesn’t call for a yolk-wash to be brushed over the pastry before it’s baked, but I did that anyway to get the wonderful brownish colour you see above.  I couldn’t find any Greek yogurt so I used regular 6% yogurt and drained the liquid over night through a paper towel to get it thicker.  Then I mixed in some honey.  I must say – it’s better than any fruit yoghurt out there 🙂 (ok, maybe Liberté Méditerranée  comes close :))

 The dough was so buttery and delicious it just melted in my mouth, and the sweetness of the peaches and tanginess of the yogurt was such a good combination.  I couldn’t wait to put this fork-full in my mouth (this plate didn’t last long at all).  My friend Bojan came by later in the evening for a drink and I was glad to have someone else taste as well.  It is now just one day after I made this, and between giving some to family and the rest to my coworkers – it’s all gone!  I think I’ll have to make it again 🙂

…………………………………………………………………………………………………………..

Click on each photo to view the high resolution images.

…………………………………………………………………………………………………………..

RECIPE

……………………………………………………………………………………………………………

Honey-Roasted Peach Croustade with Almonds and Honey-Sweetened Greek Yoghurt

Peaches:

  • 1 1/2 pounds small ripe yellow peaches (about 6-7), unpeeled, quartered and pitted
  • 2 tablespoons honey
  • 2 tablespoons brown sugar
Crust:
  • 2/3 cup slivered almonds
  • 1 cup unbleached all purpose flour
  • 1/4 cup sugar
  • 1/2 teaspoon salt
  • 7 tablespoons chilled unsalted butter (cut into 1/2 inch cubes)
  • 1 large egg yolk
  • 2 tablespoons honey
Honey Yogurt
  • 1 1/2 cups plain Greek-style yogurt (if Greek-style yogurt is not available, use 6% milk fat or higher plain yogurt and strain over night to drain the liquid out, making it thicker, resembling Greek-style yogurt)
  • 3 tablespoons honey
Peaches:  Preheat oven to 400 F. Line large baking sheet with foil.  Arrange peaches, skin side down, on foil.  Drizzle with honey and sprinkle with brown sugar.  Roast peaches until just tender and beginning to brown, about 20 minutes.  Using spatula, turn peaches and continue roasting until fruit is very tender and honey begins to turn dark brown on edges of pan, about 12 minutes longer.  Cool peaches.


Crust:  In a food processor, coarsely chop almonds.  Transfer nuts to a bowl (do not wash processor).  Blend flour, sugar and salt in processor.  Add butter, using on/off turns, process until mixture resembles coarse meal.  Drop egg yolk through feed tube and blend just until moist clumps form, using on/off turns.  Gather dough into ball, flatten into a disk.  Wrap in plastic and freeze 30 minutes.  (The dough can be made 1 day ahead.  Let stand at room temperature for 20 minutes to soften slightly before rolling out.)


Preheat oven to 375 F.  Roll out dough disk between 2 floured sheets of parchment paper to 10-inch round, sprinkling with .  Remove top sheet of additional flour as necessary.  Remove top sheet of parchment.  Sprinkle dough evenly with 1/2 cup chopped almonds.  Replace parchment atop crust and roll to 11-inch round, embedding nuts into dough.  Invert crust and parchment onto heavy baking sheet, nut side down.  Remove top sheet of parchment.
It’s nearly impossible to transfer the croustade from your counter to the baking sheet because the dough is quite fragile.  For best results, when the dough is rolled out, transfer to baking sheet and then arrange peaches over center of crust in concentric circles, alternating skin side up and skin side down and leaving 1 1/2 to 2 inch plain border.  Using parchment as aid, fold outer edge of crust over edges of peaches.  Drizzle peaches with honey.  Sprinkle with remaining chopped almonds.
Bake until crust is golden brown, about 30 minutes.  Cool 20 minutes.   The croustade is quite fragile even after it cools down. To transfer to a platter, slide metal spatula under croustade to loosen from parchment.  Using tart pan bottom from 11-inch diameter tart pan as aid, carefully transfer croustade to platter. 


Honey Yogurt: Mix yogurt and honey in small bowl to blend.

© Bon Appétit Desserts Cookbook

Pumpkin Muffins with Dried Cranberries and Pumpkin Seeds for Halloween


For our annual Halloween pot luck at work, this year I decided to venture into pumpkins. I’ve never made dessert with pumpkins before so I thought that it would be the perfect fall/Halloween dessert (well, at least by my standards :)).

One thing that I wasn’t expecting with these muffins, and this is probably because I haven’t made anything with pumpkins before, is how moist they were. After I had baked them for the recommended amount of time, they felt sticky to the touch, and I thought that they weren’t done enough. Apparently – this is what pumpkin does, and since the inside looked baked enough – this was ok. The cranberries gave the muffins an extra tang and the pumpkin seeds were a nice added crunch. I was also interested in the cranberries because of the colour variation they gave to the golden-coloured muffins. I think this played out well in the photographs.
……………………..

……………………………………………………………………………………………………….

For high resolution images, please click on each photo.

……………………………………………………………………………………………………….

RECIPE

………………………………………………………………………………………………………

Pumpkin Muffins with Dried Cranberries and Pumpkin Seeds

Ingredients:
  • 1 1/2 cups all-purpose flour
  • 1 tsp. baking soda
  • 2 tsp. pumpkin pie spice
  • 1/4 tsp. salt
  • 1 cup granulated sugar
  • 1/4 cup light brown sugar packed
  • 1 cup canned pumpkin puree
  • 1/2 cup buttermilk
  • 1/4 cup olive oil plus more for oiling muffin pan
  • 1 egg
  • 3/4 cup chopped pecans and cranberries
Preparation:
Preheat oven to 375 degrees F. In large bowl, whisk flour with baking soda, pie spice and salt.
In another bowl, combine sugars, pumpkin, buttermilk, oil and egg. Whisk until well blended.
Stir in dry ingredients just until completely incorporated. Fold in pecans. Spoon batter equally into 12 oiled muffin cups and bake 20 to 25 minutes or until muffins spring back when lightly touched in centers. Remove from pan and cool on wire rack. Serve warm or at room temperature.

Of Golden Rugalachs, Cannolis and Saint’s Days


Every October, my family celebrates, what in English can be best translated as Saint’s Day. Saint’s Day or Krsna Slava is the Serbian Orthodox tradition of the ritual celebration, veneration, and observance of our family’s own patron saint. The custom itself goes back to 7th century BC and you can read more about it here. Every October 12th, my family gathers with 20 or so of our closest friends for celebration, singing, dancing and of course tons of great food. My mom makes many great goodies, mostly traditional Serbian fare (see below for her homemade roasted red pepper salad). On this day, my contribution has usually been baked goods, and I see it as an opportunity to bake something new every year. This year I opted for Golden Rugalach and Cannolis. I wanted something fairly easy and delicious at the same time.
The Rugalach’s flakey pastry is my favourite part, as it just melts in your mouth.
…………………………….

Another thing that I really like about this rugalach is that it makes for really pretty photos. The golden colours of the apricot preserve, baked eggwash and hazelnuts are very vibrant against the white plate.

This was my very first time making cannolis. It turns out that if you don’t make the shells yourself, the process is quite easy. I chose a recipe that called for store-bought shells and I just made the filling. The combination of ricotta and chocolate chunks and cranberries is very nice. The recipe calls for dried cherries but I substituted cranberries. The filling can also keep in the fridge for several days. I ended up not using all of it so I made crepes a few days later that ate up the filling 🙂

On the day of Slava, I went to my parents house early to help with the preparations. My mom was busy at work, preparing and plating her roasted red pepper salad. I couldn’t resist capturing some of it, especially how skillful she is in the kitchen. She seems to whip up things out of nowhere and in no time, of course! 🙂 (how do moms do this?) The red roasted peppers were perfect eye candy for my 50 mm.
…………………………..

………………………………………………………………………………………………….

For high resolution images, please click on each photo.

…………………………………………………………………………………………………

recipes

………………………………………………………………………………………………….

Golden Rugalach

Ingredients
Dough:
  • 2 1/4 cups all-purpose flour
  • 1 tablespoon sugar
  • 1/2 teaspoon fine salt
  • 1 cup (2 sticks, 8 ounces) unsalted butter, cut in pieces and chilled
  • 8 ounces cream cheese, cut in chunks and chilled
  • 2 tablespoons sour cream or Greek yogurt
Filling:
  • 3/4 cup hazelnuts, toasted
  • 1 cup apricot preserves
  • 2/3 cups golden raisins
  • 1/4 teaspoon fine salt
  • Egg Wash:
  • 2 egg yolks
  • 1/4 cup sugar
Directions
For the dough: Pulse the flour, sugar and salt in food processor until combined. Add the butter and pulse until it resembles coarse sand with some pea-sized pieces of butter, about 20 times. Add the cream cheese and sour cream, and pulse until it comes together in a rough dough (with some uneven pebbles sized-pieces). Turn the dough out of the bowl onto a floured work surface and divide into 4 equal portions. Pat each portion into a flat square and wrap in plastic wrap. Freeze dough for 15 minutes
………………………….
Meanwhile, chop the nuts in a clean food processor. Add the preserves, raisins and salt; puree to make a very smooth paste. Roll a portion of dough into a 6 by 14-inch rectangle about 1/4-inch thick. (Don’t worry about slightly rough edges; these will be rolled inside of the rugalach.) Spread 1/4 of the filling over the surface with a small spatula. Starting with a long side, roll the dough up into a tight cylinder ending with the seam on the bottom. Press the top slightly to flatten; wrap in plastic wrap. Freeze for another 15 minutes. Repeat with the remaining dough and filling. (The cylinders can be frozen for up to a month.) Meanwhile, evenly position the racks in the oven and preheat to 375 degrees F.
………………………….
Line 2 baking sheets with parchment or silicone baking mats. Slice the cylinders into 1 1/2-inch pieces, and place rugalach seam-side down on the prepared pans. Whisk the egg yolks together and brush this glaze over the top of the rugalach. Sprinkle with sugar and bake until pale golden and crispy on top, about 25 minutes. Remove from oven and let cool slightly on the baking sheet. Carefully transfer rugalach to a rack to cool. Serve. Store rugalach in a tightly sealed container for up to 3 days

………………………..

Chocolate Cherry Cannoli

Ingredients:

  • One 475 g tub extra-smooth ricotta cheese
  • 3 tbsp (45 mL) icing sugar
  • 1 tsp (5 mL) vanilla
  • ⅓ cup (75 mL) chopped bittersweet chocolate
  • ⅓ cup (75 mL) dried cherries, chopped
  • 24 cannoli shells (see Tip)
  • Icing sugar or unsweetened cocoa powder
Scrape ricotta into fine mesh sieve set over bowl. Let stand for 30 minutes. Place ricotta in another bowl and discard any liquid. Whisk in icing sugar and vanilla with ricotta until smooth. Stir in chocolate and cherries until well distributed.
………………………….
Spoon mixture into piping bag or large resealable bag and cut opening. Pipe mixture evenly into cannoli shells and place on platter. Cover with plastic wrap and refrigerate for at least 1 hour or up to 2 days. (The cannoli shells will soften the longer they sit.)
………………………….
Sprinkle with icing sugar or cocoa powder before serving.
………………………….
Tip: Look for cannoli shells at Italian delis, specialty food stores and large grocery stores. Some bakeries will sell you empty shells provided you call ahead to order.